Launched by the American Motorcyclist Association in the 1980s, May is the official Motorcycle Safety Awareness Month. This campaign was started to remind all road users to safely share the road. As warmer weather takes over, many of our customers take to the road in numbers to enjoy the thrill of riding. Whether that’s for gear, a new battery, or just advice, Battery Mart has served powersport enthusiasts since 1982.
As we celebrate, it’s the perfect time to remember that safety and great riding begins before we hit the road. It begins with preparation; knowing your bike is in peak condition and ready to take you wherever you ride.
Whether your bike is just coming out of storage or you’ve already got a few rides under your belt, taking a few minutes for a comprehensive safety check will always be a great idea. We’ve compiled this guide to bring you a high-level checklist to go over – for both your batteries and your bike.
Phase 1: The Spring Walk-Around & Systems Check
You won’t need a professional setup or even a toolbox filled to the brim with specialized tools. With a little time, anyone can verify the bike’s fundamental systems are ready.
1. Tires: Your Contact with the Road
First, we’ll check out the tires. As the only part that touches the road, well-maintained tires are the beginning of riding safety.
Why Check the Tires: Proper grip keeps your bike stable and ensures you can stop quickly.
What to Do:
Check the tire pressure. Under-inflated tires make your bike feel heavy and sluggish.
Look closely at the sidewalls and tread. If your bike sat in a cold garage for a few months, check for hairline cracks (dry rot) or flat spots.
2. Lights & Visibility: To See and Be Seen
Your lights are your defense against distracted drivers.
Why Check the Headlights: Other motorists rely on the lights of other vehicles to spot them instantly. This is especially important through fog and darkness.
What to Do: Start your bike and take a quick walk around. Test both the low and high beams. Ensure your tail lights brighten with the brake engaged. Finally, confirm your left and right turn signals are operational.
3. Controls & Fluids: Smooth Stop and Go
Your controls should feel firm, responsive, and smooth.
Why Check the Fluids: For proper acceleration and braking.
What to Do:
Squeeze your clutch and front brake levers. They should feel firm. Not spongy, sticky, or loose.
Are there any puddles of oil, coolant or hydraulic fluid beneath the bike? If not, you’re off to a great start.
Beyond the Basics: The Deep-Storage Checklist
If the motorcycle has been garaged for more than three months (winter storage, for example), we highly recommend checking these five overlooked areas before riding. That said, even if the bike hasn’t been in storage, these are still things to be mindful of.
The Fuel System: Modern gasoline can degrade in as little as 30 days. For instance, if you didn’t add fuel stabilizer, old fuel can gum up your carburetor or fuel injectors. If the bike idles rough or hesitates, you may need a fresh tank of gas or a deep clean.
Coolant Levels: If your bike is liquid-cooled, check the overflow reservoir. The fluid should be clean, at the correct level, and free of debris.
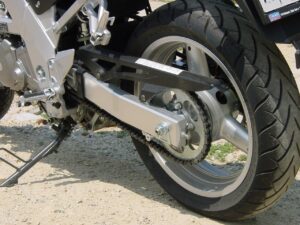
Chain or Belt Drive: Inspect your drive chain or belt. Look for stiff links, check for correct tension (usually 1 to 1.5 inches of play), and apply a fresh coat of high-quality chain lube to prevent rust and binding.
Brake Fluid: Take a look at your brake fluid reservoirs. The fluid should be a light amber color. If it looks dark like coffee, it has absorbed moisture over the winter and needs to be flushed.
The Air Filter: Critters love to build nests in dark, warm places like motorcycle airboxes over the winter. Open up your air filter cover to ensure there are no obstructions, acorns, or dust blocking your airways.
Phase 2: Power Up with Confidence (The 4-Step Battery Audit)
A dead battery is an annoyance – we’ve serviced a lot in our stores since 1982. A failing battery has cascading implications: you lose your starter, your lights, and emergency hazards; leaving you exposed and vulnerable on a busy highway.
Keep your battery healthy with these four simple steps:
First: Verify a Full, Healthy Charge
The Benefit: Effortless starting power every time. This will reduce wear and tear on your starter.
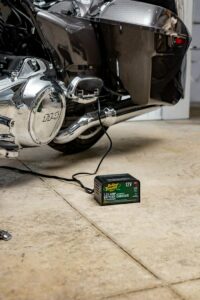
The Action: The easiest way to keep your battery healthy is to use a dedicated smart (automatic) charger. Unlike old-fashioned manual chargers that can overcharge and ruin a battery, a smart charger reads your battery’s condition and keeps it safely at full charge.
The Solution: We highly recommend Battery Tender Smart Chargers. They can be left charging indefinitely. And, with their quick-disconnect leads, you can leave the rings attached and plug the charger in when needed. Battery Tender = Zero Hassle.
Second: Inspect Terminals and Connections
The Benefit: A tight, secure connection keeps your electronics running smoothly. This prevents stalls or flickering lights.
The Action: Give the cables a gentle pull. If they move, tighten them up. And, be sure that all your connections are flush to the terminal.
Third: Hunt Down and Clear Corrosion (With Safety First!)
The Benefit: Keeps power flowing smoothly, better charging times, and extended life for the battery.
The Action: Is there any build-up around the battery posts? Look for a white, powdery substance or greenish build-up. That’s corrosion.
Safety First: Always wear protective gloves and eyewear when handling battery terminals. You’re working with dried battery acid and you don’t want that on your skin or eyes.
How to Clean It: Mix a tablespoon of baking soda with warm water. Using a wire brush or old toothbrush, brush it onto the terminals to neutralize the acid. Then, can you wipe it away with a clean rag.
Fourth: Carry a Jump Starter
The Benefit:Jump-starters are the natural evolution of booster cables. You won’t need to wait for tow-trucks or other motorists for a boost.
The Action: Keep a compact, motorcycle-appropriate jump-starter on your bike. We recommend the lithium jump-starters from NOCO: Small and light enough to keep on-hand, but enough power to start the biggest powersport engines.
Battery Troubleshooting: Charge It or Replace It?
Not sure if your battery just needs a quick charge or if it’s time to replace it? Look out for these warning signs:
Slow Cranking: If you turn the key and the engine struggles to start, your battery’s voltage is low. Try putting it on a Battery Tender Charger overnight. After charging, if the battery still cranks slowly after a full charge, the battery should be replaced.
Flickering Lights: If your headlight flickers when you start the motorcycle, this can be a sign of a weak battery or a loose ground wire.
Won’t Hold a Charge: If you charge your battery, but it goes dead again after sitting for a few days, then the cells inside have likely degraded. It’s time for a brand-new battery.
Phase 3: Spring Roadcraft (Navigating Seasonal Hazards)
Once your motorcycle is ready, your safety comes down to road awareness. Spring riding presents unique hazards that require extra attention compared to mid-summer cruising. Keep these three seasonal challenges in mind:
1. Watch Out for “Freeze-Thaw” Potholes
Asphalt cracks during the freeze/thaw cycles of winter, leaving tire-damaging holes behind.
The Strategy: Avoid tailgating (even more so than normal). Always give a 3-to-4 second gap behind the vehicle in front of you. This gives your eyes time to scan the pavement for upcoming fractures. It also gives your brakes room to bring you to a controlled stop.
2. Beware of Leftover Winter Sand and Gravel
Road crews spread sand, salt, and gravel to melt ice, and much of it builds-upin intersections and sharp highway curves during the spring.
The Strategy: Turn with restraint during early Spring. Sand acts as tiny ball bearings under your tires, reducing traction. Slow down before curves, keep the bike upright, and avoid sudden braking or acceleration during leaning.
3. Navigate Damp, Shaded Spots and Wet Leaves
Spring showers are common, and shaded sections of the road (especially under trees or bridges) can stay wet hours after the rest of the road has dried. And old, rotting leaves from autumn can pile up in corners.
The Strategy: Ride in the tire tracks of the cars ahead of you, where the road is the driest. If you must cross wet leaves or a damp, shaded patch, maintain a steady speed, and avoid abrupt steering.
When to Call a Professional
While most spring prep is easy to do yourself, there are still issues that require a professional mechanic. So, don’t hesitate to take your bike to your local shop if you encounter:
Spongy Brakes: If your brake levers feel soft after checking fluid levels, you may have air in your brake lines. This will require professional bleeding.
Deep Corrosion: If corrosion has eaten away at your battery cables, a simple baking soda bath won’t fix it. Have your wiring replaced.
Fuel System Clogs: If your bike refuses to start or runs terribly after sitting, your carburetors or fuel injectors could need a professional disassembly and cleaning.
Enjoy the Ride Ahead!
We hope you’ve found value in this article. Preparation goes a long way in a lot of aspects of life, and riding is no exception! It only takes a little time to keep your essentials after the winter, but that can translates into hours more riding time. Sounds like a great trade-off, doesn’t it?
And if you need to gear up, head over to Battery Mart to explore our complete line of reliable, easy-to-use Deltran Battery Tender Chargers and Maintainers and make sure your ride is ready to roar every single time you turn the key. Or, if you determined the battery’s best days are behind it, we have a full assortment of motorcycle batteries to choose from.
Ride smart, stay prepared, and enjoy the beautiful riding season ahead!